


How to build a crab
 For those of you interested in the more technical aspects of the game’s development I thought I would present the method I used to create the crab model. As a side note, I’ll have to spread that presentation over several updates, as Indiegogo only allows for one picture per update. Before starting to work on the model, I always surround myself with visual references (photographs, paintings) and make mental notes of aspects I will emphasize in order to end up with a model that’ll be interesting enough.
It all starts with a simple cube (within Maya), followed by other cubes to roughly represent all the body parts and get a feel for the overall volume of the limbs. As you can see, it’s all very blocky and I do not worry about details at this stage. It’s best to check that everything looks as expected now (in terms of overall morphology), as it will become more difficult to change things further down the line.
Then I start to work on the body parts in Zbrush (bottom picture), simply refining the broad shapes. Again, not caring too much about details yet; just roughing in the main volumes. Note that at this stage I already know I’ll have to open the arms of the creature so I can get a better look while sculpting. But starting with the arms folded ensured that the crab would eventually be able to get into that pose later on.
 Once I’m fairly happy with the overall proportions, the next step is to start adding tiny scratches and bumps to the surface in order to imbue a more organic aspect to the creature. To do this, I subdivide the model a few times so that there is enough resolution to accommodate those detail; the faces become so small that you can’t see the individual polygons anymore.
Again I use Zbrush which is an excellent sculpting tool (despite its somewhat unintuitive interface). It is capable of dealing with huge amounts of polygons and allows the user to imprint the minutest details directly on the model’s surface. Of course at this stage I need to be fairly certain the model is not going to change drastically in terms of appearance. Otherwise all this work would pretty much have to be redone.
 The model is not painted yet and it is so dense (several millions of faces) that it would be absolutely impossible to use it in a real-time game engine. So the next phase will aim at getting a model that can eventually be animated and used in-game. Now that the model is almost finished in Zbrush, I export the high-resolution mesh back into Maya. There, I create a lower-resolution of the model, which is destined to be used in-game.
The low-res mesh envelops the high-resolution mesh so that the volumes are maintained. Since the model is obviously going to be animated I need to make sure that the topology allows for bending the limbs in a practical way. The quality of deformations depends on it.
The impression of the model being highly detailed is going to be preserved thanks to the use of a normal-map texture (not shown here). But the important thing is to make certain that the overall silhouette does not show large straight edges so that the illusion of it being higher-resolution is not broken.
You can also see that the spiky hair on the edges of the legs are actually flat polygons which will receive a texture to give the impression of many little strands bunched together. The same technique is used with the weeds that hang on the creature’s back; those are simple sheets of flat polygons with a cutout texture applied. As I said earlier, in the end the low-resolution mesh will look like the high-resolution one because details are going to be baked into the normal map.
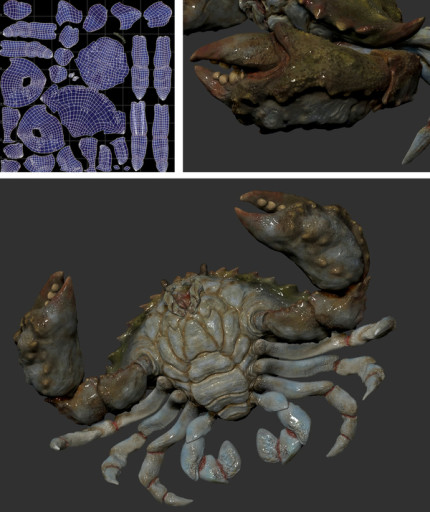 But we still have a gray model; in the next phase, color information will be added… The final step in creating the model is painting the color texture (called “diffuse”). What you see on the top left corner is the UV map: the pieces of the low-resolution mesh that I modeled during the previous step are cut open and stretched flat.
Those flattened shapes (similar to an animal’s pelt) will receive the color information that gets painted on the surfaces. Note that there are different techniques to create the color texture for your models. In that case I chose to paint the texture from scratch, not using any photograph projection.
I really enjoy painting with a simple airbrush whenever possible; it gives me the feeling I’m working on a real-life figurine.
The trick is to make sure the color variations blend nicely and make sense with the detailing that already exists on the sculpture; like it just belongs there. And that step concludes the creation of the model itself. I hope you guys have found this little presentation interesting!
Felicia
June 7, 2018 at 10:25 pmHello, thank you so much for sharing your process. I was wondering if you always use Zbrush when dealing with character models or if it is only with the ones that have more relief and details.